Exploring Location, Demolition Time and Fireplace Alterations!
A little bit of a shorter vlog as my dad and his partner came over for the weekend to help with some demolition!
Click here to watch the vlog or see below.
I had set my alarm for bright and early in the morning, but when I woke up, I saw I text from my dad saying that they were setting off 2 hours later than anticipated as he was getting the flu vaccine, so I ended up having a rather chilled morning in bed instead. I then walk up and got ready for the day before they arrived to work.
We first had a little tour of the house, as Karen hadn't seen the house at all and dad hadn't really been since I first moved. It was quite fun to show it to someone brand new who hadn't seen the majority of the work. The first job was ripping out the utility room, both the units and the panelling and then cutting up an old wardrobes and storage unit that the previous owners left in the garage. Once they were done, as I had a car full of recycling already from the kitchen units, we headed to the recycling centre with two full car loads before heading back to finish up. Afterwards, dad finished the beading in the study and pulled up the carpet in my bedroom ready for my fitted wardrobes to be built the week after.
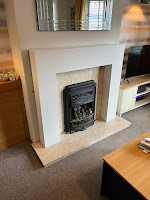
The next day, it was more finishing up loose ends, with the fireplace being one of the main things. I ripped out the old plaster intricate and dated fireplace when I first bought the property and struggled to find a fireplace to fit with a gas fire. I ended up buying a relatively cheap one online and got the chimney breast replastered for it to fit. It wasn't until I went to fit it, that it became clear the plaster wasn't perfectly straight, so there were some quite large gaps around the fireplace. I had tried to seal it but that had failed miserably. Dad suggested beading instead, so I headed to B+Q and picked up some beading and some skirting board as well to put around it, which would almost finish the room off. It ended up being a little bit trickier than anticipated and to be honest, I absolutely hated the entire process.
The skirting board looked great straight away and I was really happy with the finish. The beading around the outside of fireplace was a disaster. It still didn't fit snug against the wall, it was dirty, glue was everywhere and it pulled off a lot of the paint on the chimney breast. I spent hours the next day trying to sand the glue off and paint the majority of the surround, as well as using wood filler and primer to connect the joints. I still didn't love the beading but as I sat looking at it into the evening, I decided to add beading to the inside as well as I had just enough left over. Although it's not perfect, I do think it looks so much better. I ended up putting my cards back up to hide the dirt on the top beading, which really does made all the difference! I think I will get some fairy lights to put around in the long term.


Comments
Post a Comment