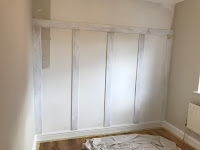
How to: Basic Wall Panelling
I think the biggest interior trend of 2022 is wall panelling. There are so many different types and different ways it can be done and I fell in love with it a long time ago, so I knew I wanted to incorporate it into my new house somewhere. I was originally wanting it in the spare bedroom, but because of my bed I didn't think it would look right next to each other. I then thought I could put it in the master bedroom, but I was already having the furniture in panelling so I decided to put it in the office. I looked at all the options and decided keep it fairly simple with just the basic board panelling.
I started by measuring the space. I felt the easiest and best looking would be to split it into four, with 5 panels. I then measured the length of the wall as well. I also decided to make the lengths 10cm in width for ease. I decided to get the medium thickness MDF available at B+Q and whilst there, also got them to cut the lengths. Unfortunately, due to their machine, although I'd calculated it perfectly to fit the lengths onto one MDF board, they couldn't cut the last two so I ended up having the purchase a second board which ended up being a lot more expensive than originally anticipated, but you live and learn! I got five lengths cut at 160cm long 10cm wide. Then I had to get two lengths for the top piece as they didn't come in the length I needed, so I got two 180cm long 10cm wide.
Everything else I needed, I also bought from B+Q at the the same time. I needed wood primer, no nail glue, a scraper, wood filler and sealant. I thought it would be quite easy to do, but I was very wrong. I painted and primed all the pieces before putting them on the wall. I then used no nails glue to fix them to the wall. I started with the two end pieces at either side of the wall edges, making sure they were level. I then measured the half way point for the third, and then repeated this for the second and fourth.
The final piece I thought would just stick nicely on top, but when placed in position it was at a very significant angle. I hadn't considered the fact that the floor and walls weren't straight so it was all a bit of a nightmare. I ended up having to call for help. We ended up having to saw the tops of the pieces off, with an electric saw, whilst they were glued to the wall, which wasn't ideal. The second needed 0.5cm, the third needed 1cm, the fourth needed 1.5cm and the fifth needed 2cm. What a nightmare! Then we stuck the final piece back on and it looked perfect!
Once on, I used wood filler to fill in the connections and a scraper to make it level. Finally, we went round all the edges using sealant. The sides needed a lot filling in as like mentioned, they were very uneven. Don't forget to also do around the skirting board!


Comments
Post a Comment